Gesture-based payments
10/10/2022Currently, the most popular forms of contactless payment include the use of “Tap to Pay” with cards, phones and smart watches. You bring your device close to a terminal and have your payment processed in a few seconds. Other interesting technologies are being considered as potential future payment methods, one of them being gesture control. Several patents have already been filed for this, including one that would add a module dedicated to gesture control on a credit card and another that would store user-defined gesture data in the user’s mobile phone to build a gesture based authentication for wireless payment.
Gesture data can be recorded in many different ways and in this post, I will explain how to prototype a different gesture-based payment system in a few lines of code, using an Arduino Nano 33 BLE Sense (a microcontroller for IoT projects), the machine learning library TensorFlow.js and some JavaScript.
Below is a prototype I built that uses a Terminal device to collect payment details from a credit card and only processes the payment once the user confirms the purchase with a custom gesture.
It works by creating a Payment Intent on the server, collecting the payment method via the Terminal and waiting for a user gesture. If the user executes a gesture that isn’t recognized as a pre-trained one, it displays the message “Incorrect gesture” in the UI. On the other hand, if it is recognized, it processes the payment.
This type of technology could be used to prevent unauthorized use of a stolen credit card or phone, for example. The same way that nowadays people use multiple factor authentication when logging into online platforms, payment could benefit from the same concept.
Training a machine learning algorithm with gestures data
The first step to build this project is to build a machine learning model that can recognise different gestures.
To do this, you can use a project built by Google Creative Labs called Tiny Motion Trainer. This interface lets you record different gestures, feed this data into an algorithm to create a machine learning model, test it for accuracy and export it as a file you can add in your app, all in just a few minutes!
Getting the Arduino ready

To make this work, upload a sketch (program) to the Arduino to add some machine learning functionality. By default, an Arduino does not have this built-in logic until you upload a sketch to it. What this sketch does is implement the functionality needed to run the machine learning model once it receives it from the browser.
You can find the instructions on how to do this in this repository.
Connecting to the Arduino
To capture gesture data, the Arduino needs to be connected to the browser. This happens using bluetooth and the Web Bluetooth API.
For security reasons, this API requires a user action to start scanning for nearby devices. In general, this interaction is a button click to indicate that the user is intentionally trying to connect to a device.
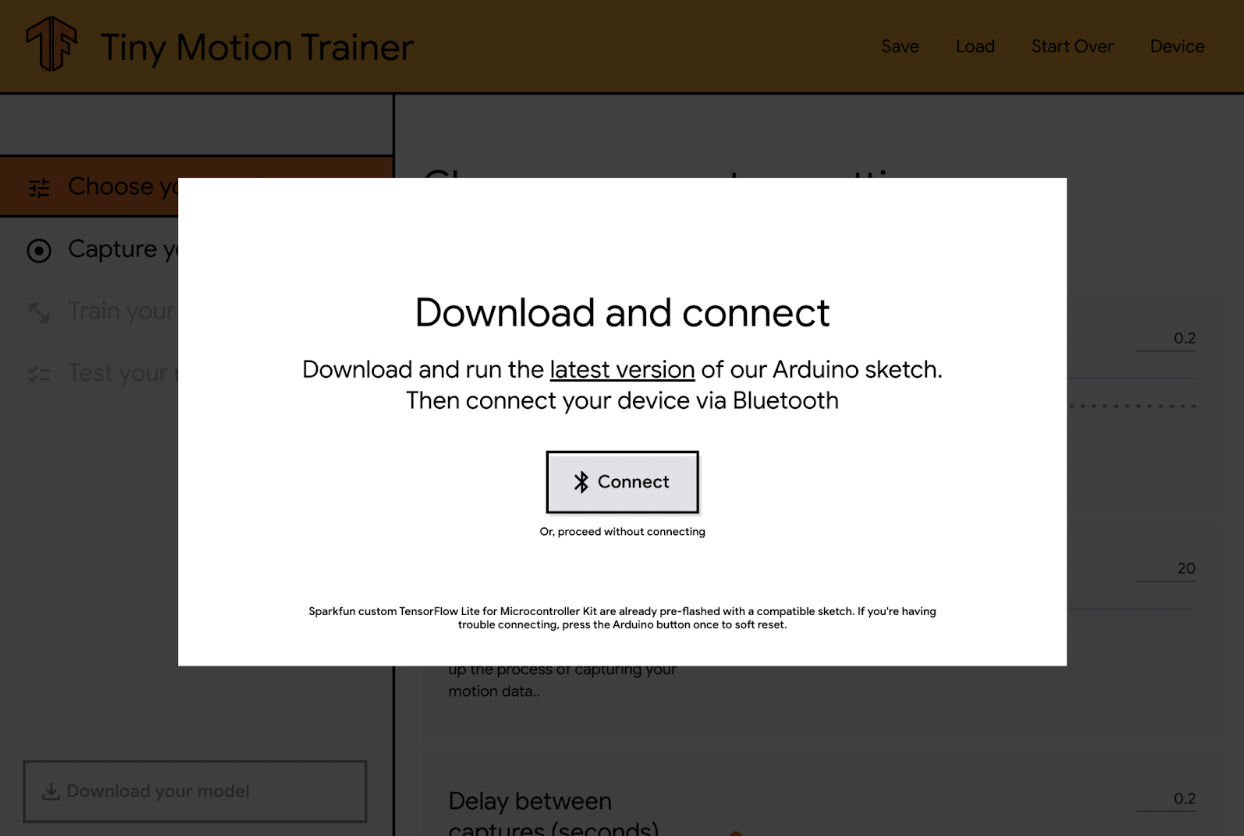
Using Tiny Motion Trainer, clicking on the “Connect” button will open a popup with the list of nearby Arduino devices you can connect to.
When the connection is successful, you should see the first setting being updated as you move the Arduino.
I will talk about what these settings mean later in this post. For now let’s move on to recording gesture data.
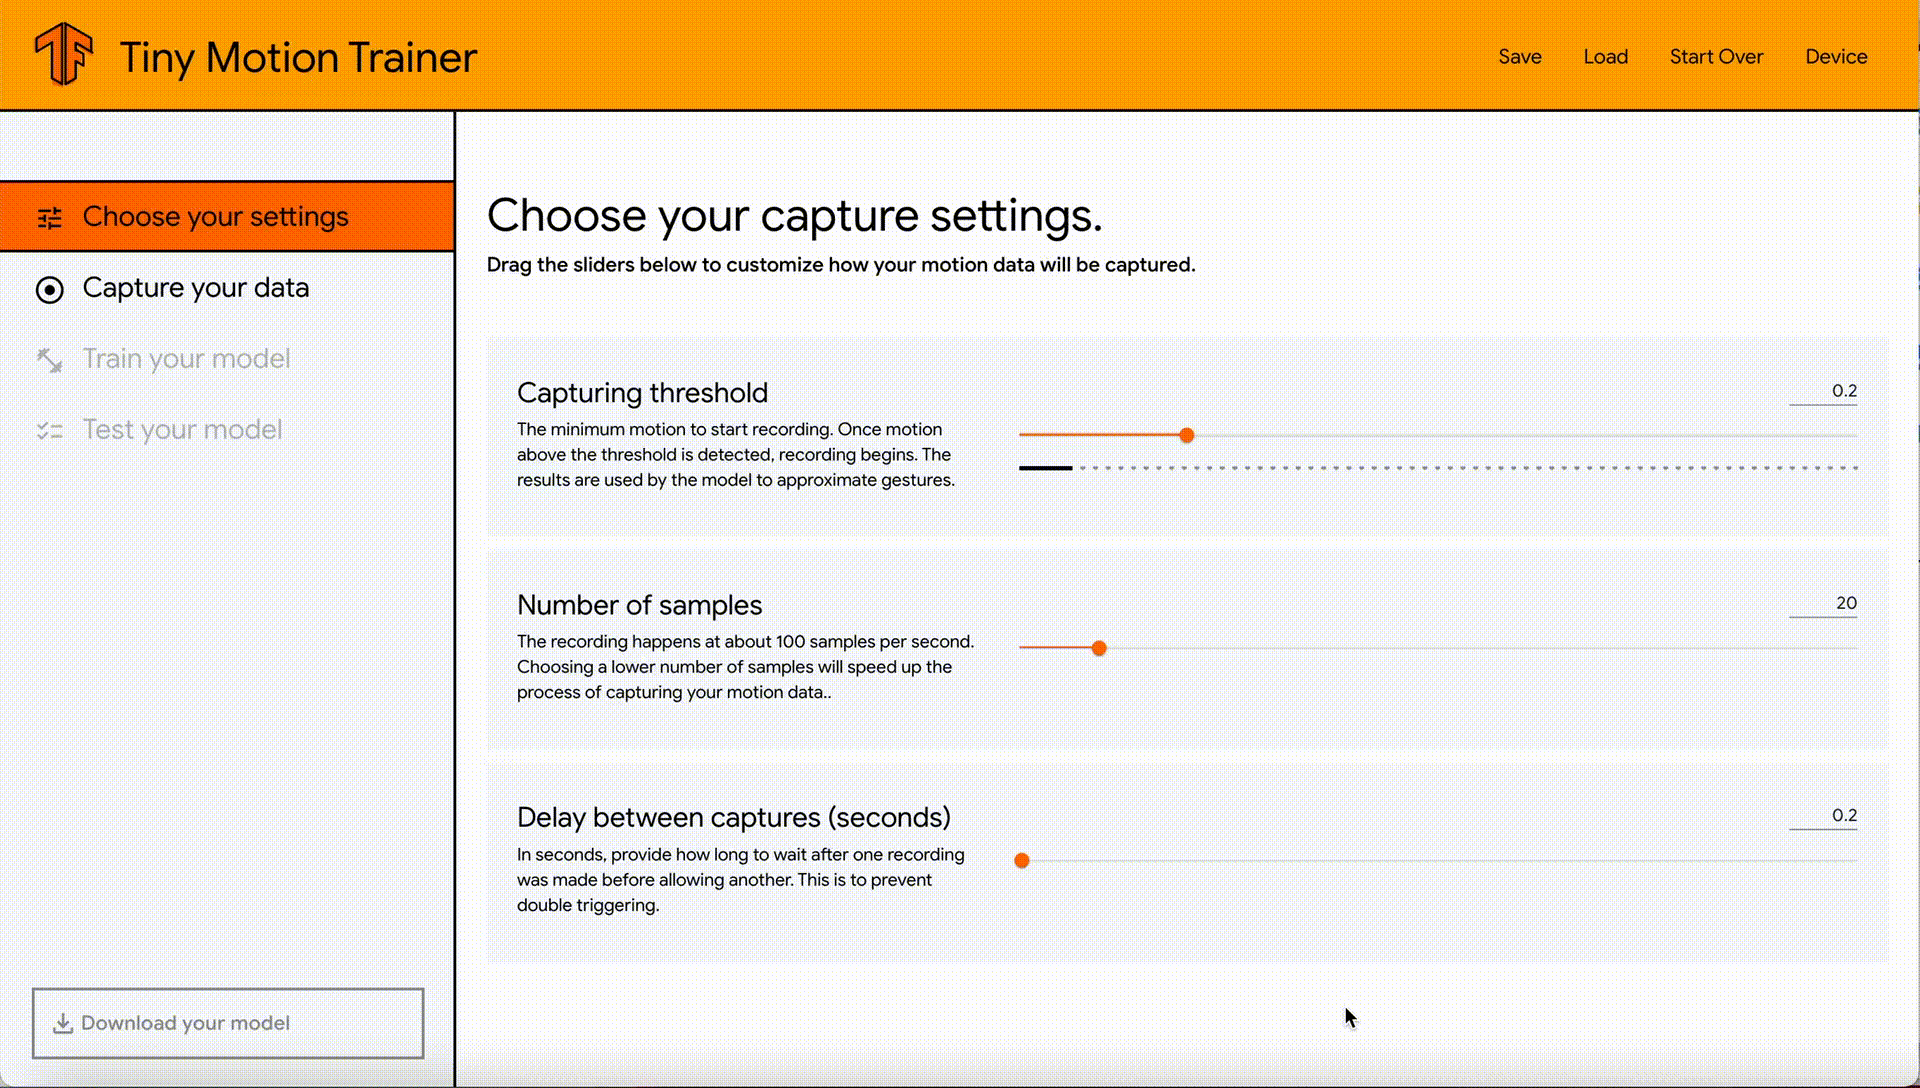
Capturing data
Once connected, you can start capturing data about the gestures you’re interested in. For the rest of this post, I’m going to use examples of hand gestures but attaching the Arduino to your leg to detect squats or even to a washing machine to detect the different stages of the laundry process would also be valid inputs.
First, pick a label for your gesture, for example “Rotate right”. Then, while holding the Arduino in your hand, click the “Start recording” button and repeat the gesture to record multiple samples. The number of samples you record is up to you, but the more you have, the more accurate your model is likely to be. Personally, I always record at least 10 samples per gesture.
Once you are done recording samples for your first gesture, click on “Stop recording”, pick a label for your second gesture, for example “Rotate left”, and repeat the same process.
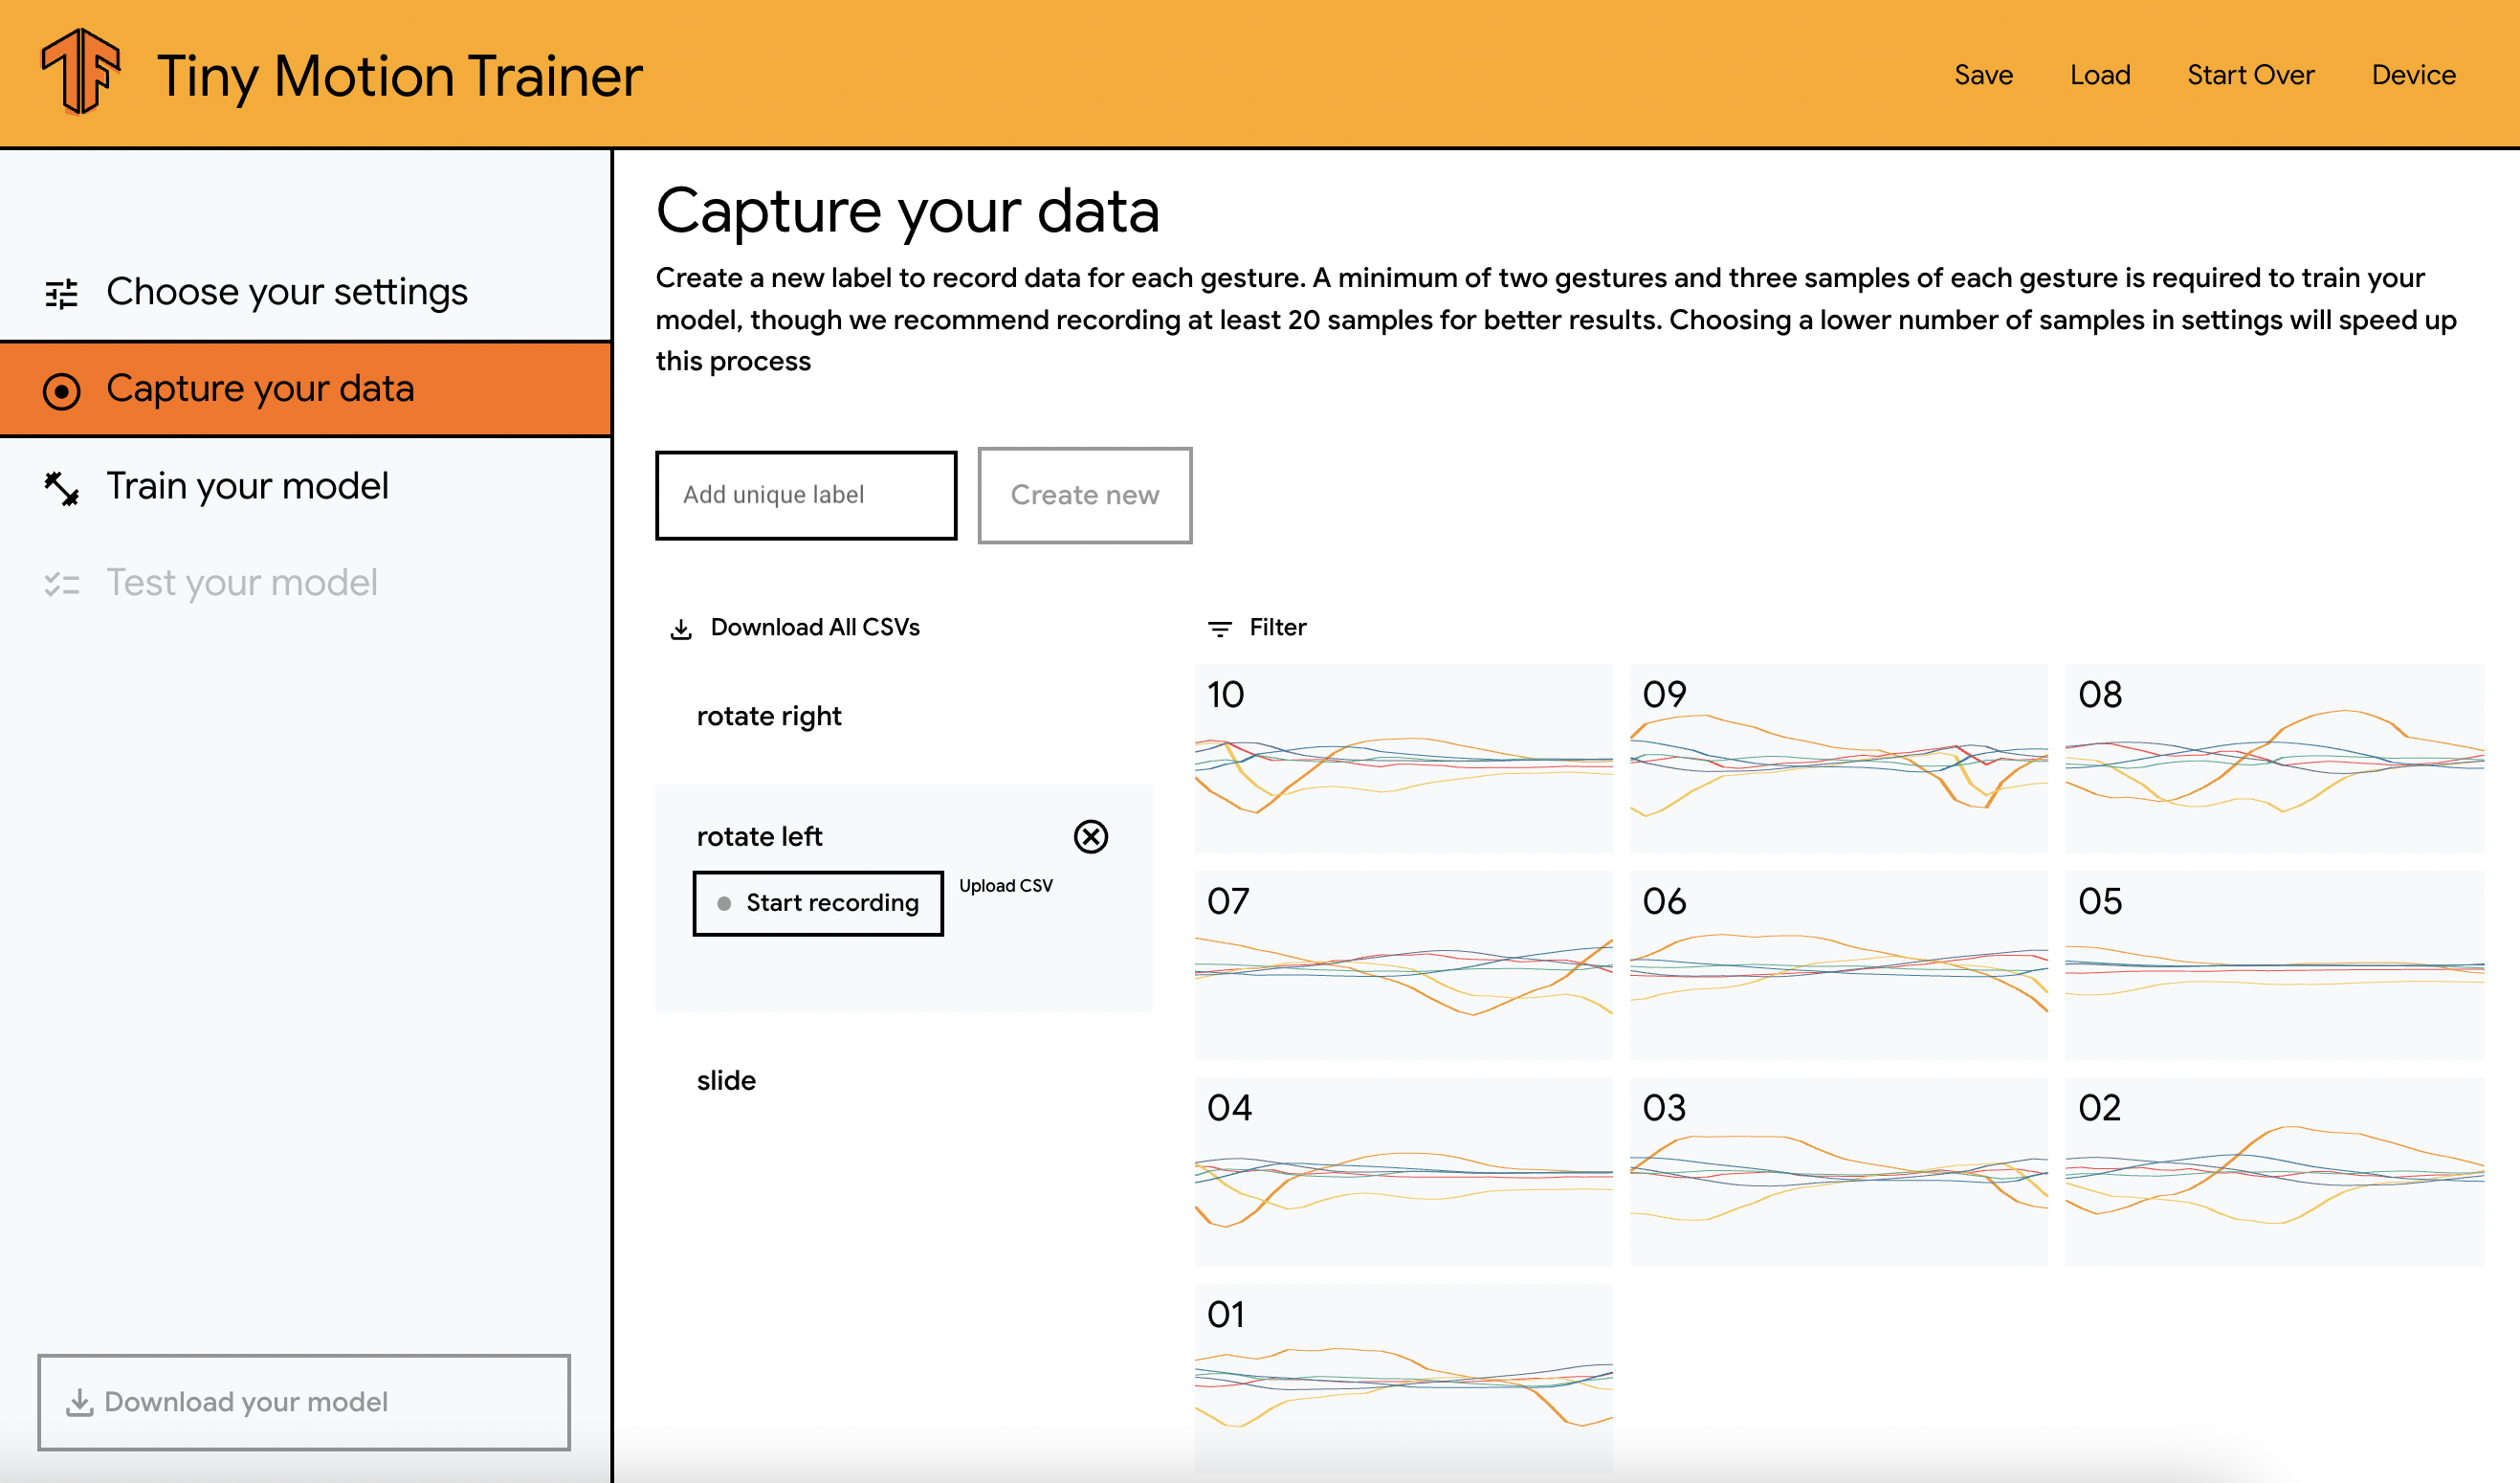
You will see on the right side of the screen that every time a sample is recorded, a data visualization is displayed. What these represent is a visualization of the live data coming from the Arduino – more specifically, the data from the x, y and z coordinates from the gyroscope and accelerometer.
Ideally, these graphs should look quite different between the gestures as it will be more likely that your machine learning model will be able to easily recognise them. If you choose gestures that are quite similar, you might want to record more samples to help the model find how to differentiate between them.
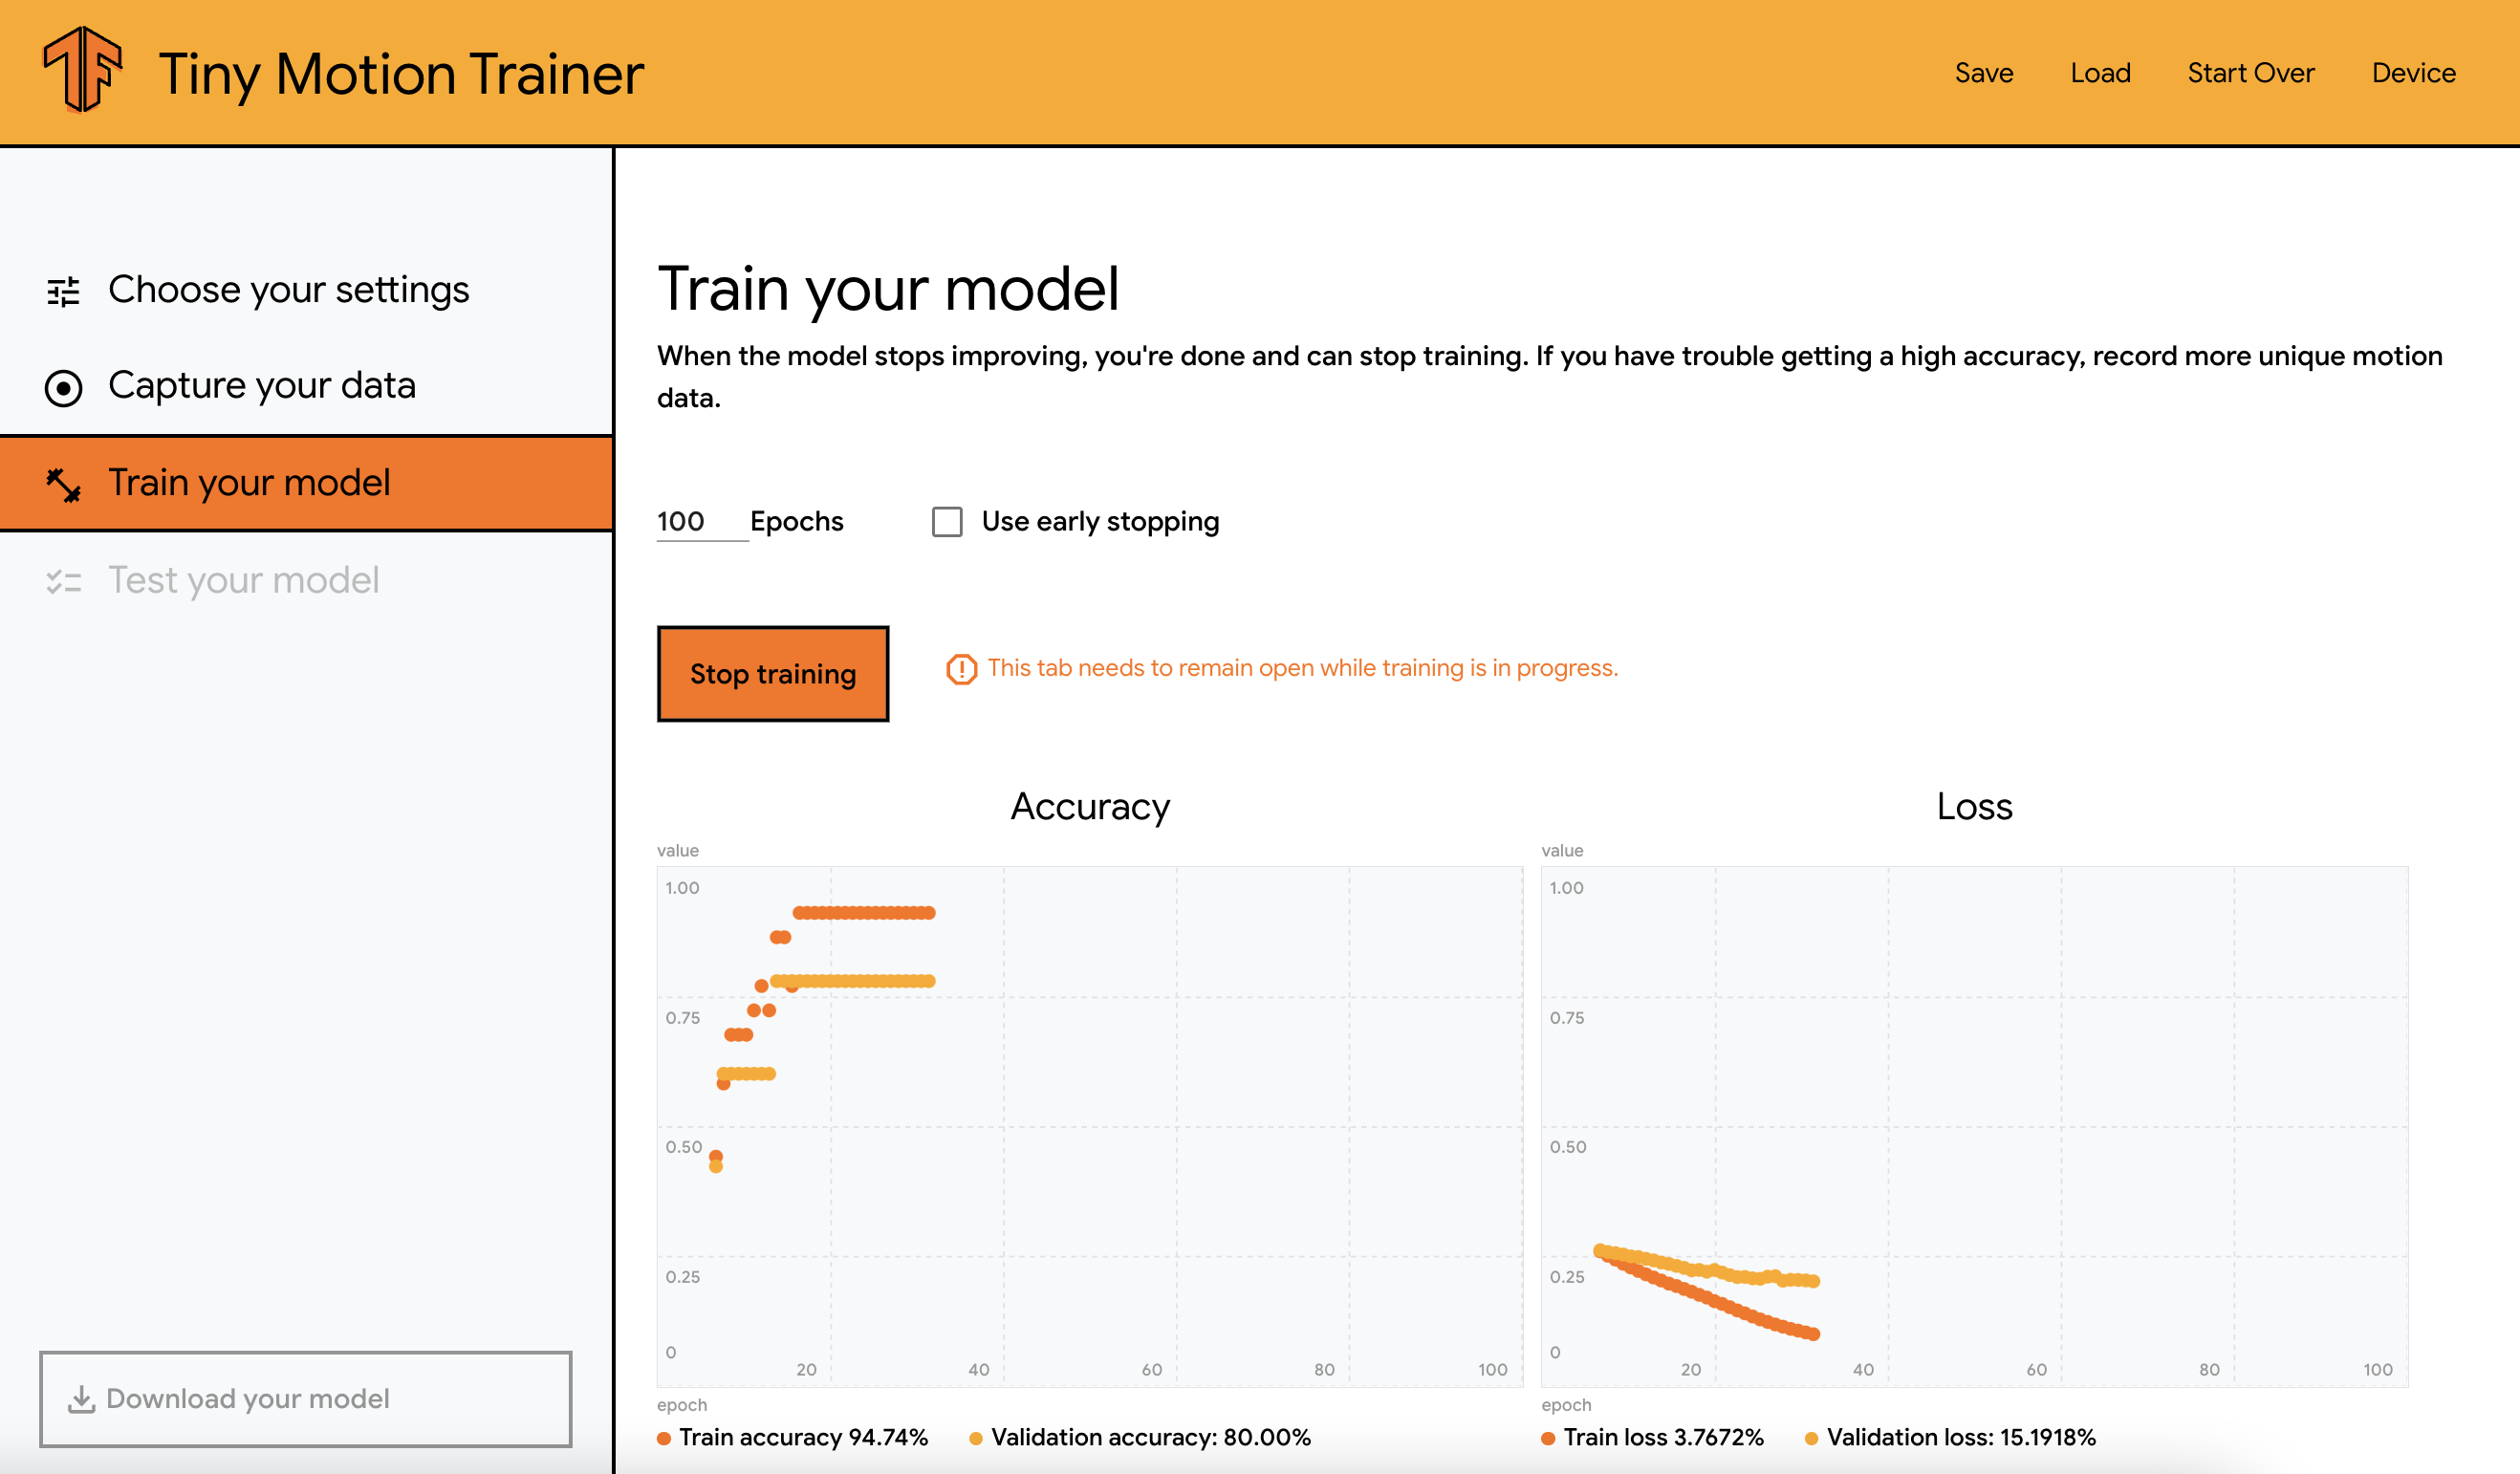
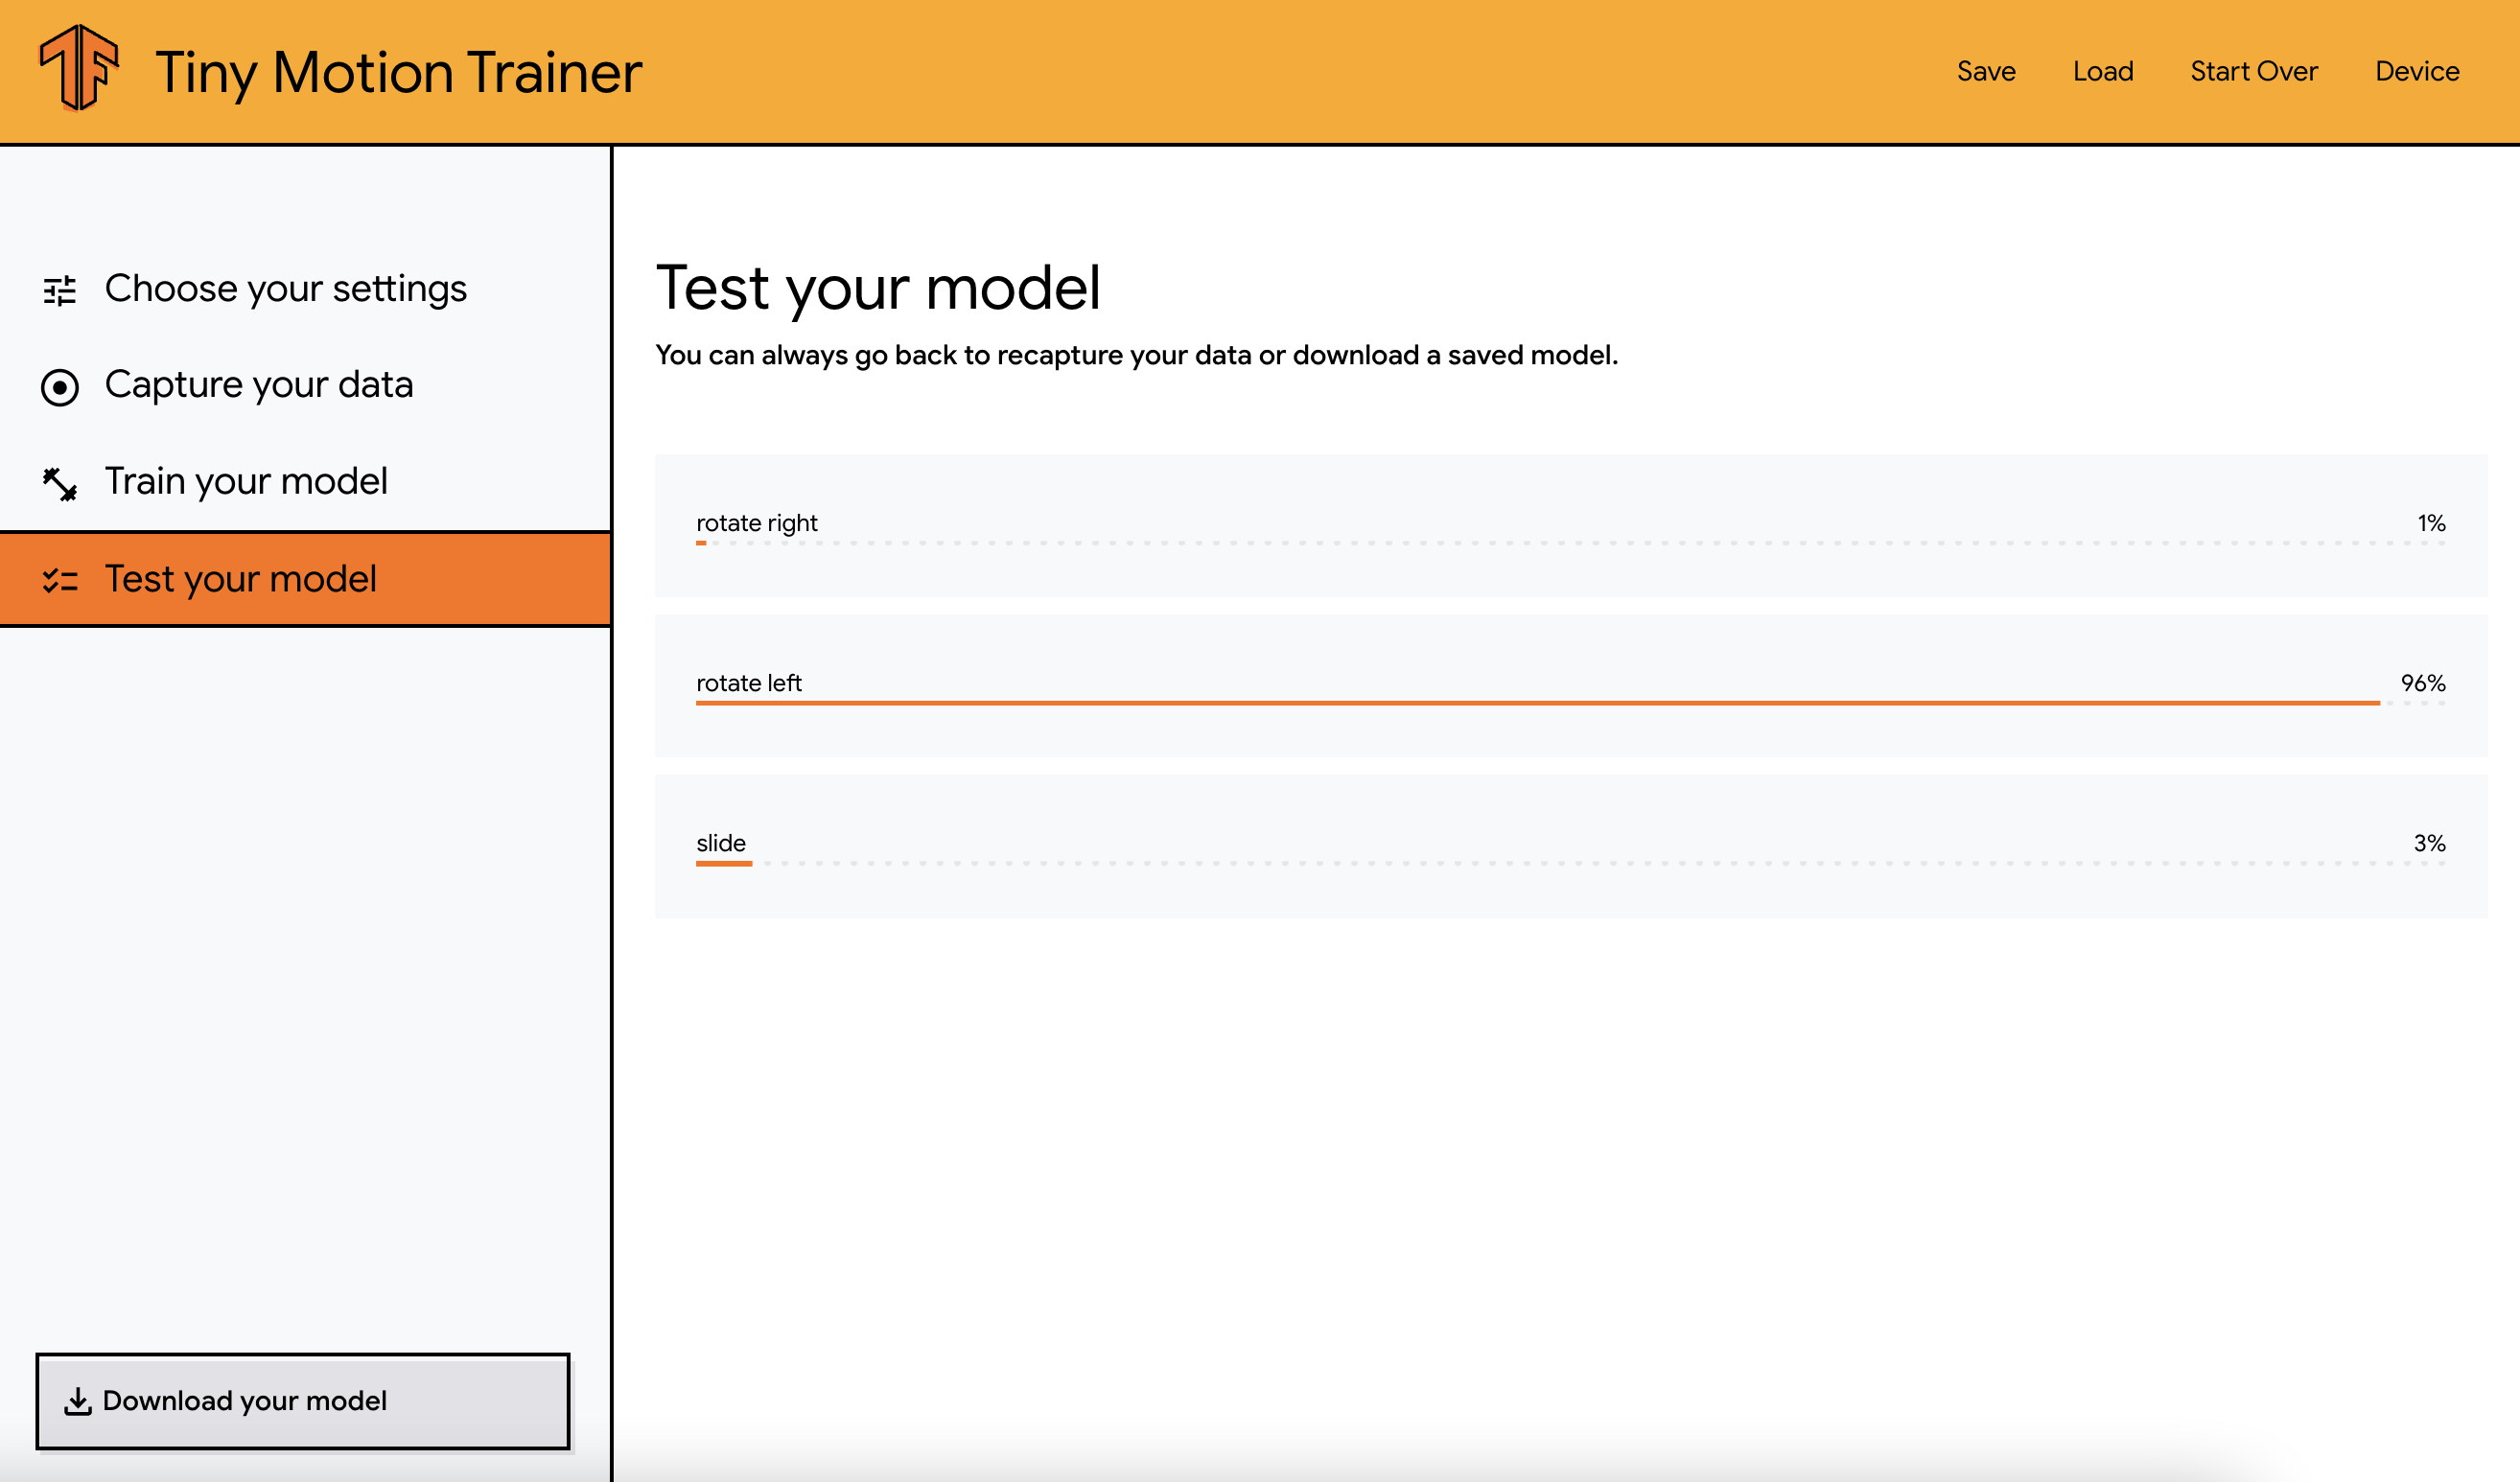
Training and testing the model
When all the samples are recorded, the next step is to train the machine learning model. What this means is that the model is going to look at all the samples and attempt to learn patterns that will help predict accurately between the two gestures. To launch this step, select “Train your model” in the left section, click on the “Start training” button and let it do its thing! You’ll see two graphs on the page updating as the algorithm is being run. The “Accuracy” graph shows the percentage of accurate predictions the model is making while being trained. The higher it is, the better. The “Loss” graph represents the amount of errors on the predictions done in the training step, which will hopefully decrease over time.
The time this process takes depends on the number of gestures and amount of samples previously recorded. If you only create two gestures with 10 samples, it will only take a few seconds.
Once it is done, you can move on to the testing step. This section should show your gestures, and you should be able to test the accuracy of the model created by repeating one of your gestures and verifying that the correct label is highlighted.
Exporting the model
If you’re happy with the accuracy, you can then export your model to use it in your app. You can either export it for Arduino or TensorFlow.js. When exporting for TensorFlow.js, the model is downloaded as a JSON file and I’ve had some issues with it not uploading to the board correctly, so instead, I used the export to Arduino option that downloads a .tflite file that works as expected.
The model size is relatively small (the 3 gestures shown above result in a 8kb file), so it’s perfect for low-memory devices used for IoT projects and overall impressive for a machine learning model!
Once it is exported, it’s time to move on to writing the code that will use the model to add gesture control to a web app.
Adding gesture control to a web app
To make this easier, Google open-sourced a script that handles most of the logic to load and transfer the model to the Arduino so you only need to write about 10 lines of front-end code!
First, add a button and import the script in your HTML file:
<button id=”connectButtonContainer”>Connect</button>
<script src="tf4micro-motion-kit.js"></script>
Then, write the following code:
window.tinyMlExperimentBleInterface.createConnectButton("#connectButtonContainer", {
  model: "model.tflite",
  numClasses: 3,
  threshold: 0.228,
  numSamples: 10,
  captureDelay: 0.2,
  onInference(data) {
    data.index === 0 ? console.log("Rotate left") : console.log("Rotate right")
  },
});
That’s it! The code sample above adds an event listener to a button on the page with the ID “connectButtonContainer”, that can initialize the connection to the board.
Then, the object passed contains the parameters used when creating the model using Tiny Motion Trainer.
If you’re interested, here are some details about what they mean:
-
model: the path to the machine learning model file in your application folder -
numClasses: the number of gestures you trained -
threshold: the threshold at which the model will start to classify a gesture based on the live motion data. The lower the threshold, the more sensitive the system will be, meaning the model will try to predict a gesture even when the Arduino is not moving much. The higher the threshold, the more intense the gesture will need to be to start predictions. -
numSamples: the number of samples recorded per second. -
captureDelay: the delay between the collection of live data used to predict a gesture. The lower the number, the faster it is going to use live data to predict a gesture. For example, if you are building an application where your user might move fast and you need to be able to classify different gestures at a rapid pace, you will want this capture delay to be low. -
onInference: this function triggers when the machine learning model on the Arduino has recognised a gesture that matches one of the ones that was trained, and sends a notification to the browser. The data object returned contains the index of the gesture. If your first gesture was “rotate right”, then it will have index 0, if your second gesture was “rotate left”, its index will be 1, and so on.
From there, the rest is up to you! These tools handle the complex machine learning logic so you can focus on experimenting with interactions and building your application! You could use this to build games, experiment with musical interfaces, fitness apps, home automation, and more.
Considering that gesture recognition in this case is done by using data from an accelerometer and gyroscope, the same concept would work on any device that possesses these sensors including phones and smart watches. It wouldn’t be too far-fetched to imagine it working on an Apple or Android watch that would use custom gestures to trigger actions such as locking/unlocking your computer, changing TV channels, controlling the volume of your sound system, making your own fall detection system, or even authorizing payments.
Additional thoughts
While prototyping this, I ran into a few limitations that might be interesting to mention. These will focus specifically on using this technology as a potential payment method.
Limitations
First, the browser compatibility for the Web Bluetooth API. At the moment, it is only supported on Chrome, Edge and Opera. From what I understand, Apple is not interested in implementing it in Safari and on iOS devices so it wasn’t working on my iPad, and I assume wouldn’t work either on an Apple Watch.
Then, the fact that the model is stored in the app. Thinking about what this could be like if it was a real payment method, the model should be stored on the device itself and only send a confirmation token to a merchant’s terminal, instead of the index of the gesture. Additionally, a gesture could be considered Personal Identifiable Information (PII) that should be protected to stay compliant. This is definitely possible on a phone or smart watch, just not with the Arduino.
Additionally, this wouldn’t be practical using Bluetooth. A merchant’s terminal should not have to connect to a customer’s device to be able to receive details; however, an authentication token could be sent via NFC, the same way that details are exchanged currently between terminal devices and cards.
Finally, using gestures solely would only work if a customer is part of a program that already possesses their credit card details. If a gesture is not used as a confirmation input but as the payment method itself, we need some way to match payment details to this gesture and this user. For example, let’s imagine that a customer wants to pay with gestures that they trained on their smartwatch. We could imagine a system in which a merchant is using Stripe Terminal devices and the customer happens to have a Stripe account in which they have registered their watch’s serial number as well as their credit card details. When this customer executes one of their trained gestures, their watch could transfer a token representing the gesture and the watch’s serial number to the Stripe Terminal. This could be used to confirm the identity of the customer and automatically process the payment as Stripe would already have their payment details stored. This is just an idea, but this is how I would picture it working.
Conclusion
Using an Arduino and Tiny Motion Trainer is a great way to get started and prototype a proof of concept.
As this relies on using an accelerometer and gyroscope sensor to record different gestures, a similar system can also be built using the sensors on your phone or smartwatch.
If you’d like to learn more about how a machine learning model is transferred to an Arduino via bluetooth, I will publish a post dedicated to that soon.